Weeks 20 and 21: Still Hexagons

IMG_8750

So I obviously didn’t post anything last week, but I was and have been hard at work on my hexagons. Last week, I finished the final color combination and weaved in a million, billion yarn ends.

IMG_8749

Then, thanks to a few days at jury duty, I started in on the fourth color on each hexagon. (And thanks to Erin‘s suggestion, I smuggled in a nail clipper to cut the yarn, since I was pretty sure scissors would be frowned on at the courthouse.)

95 hexagons!

This week, I’ve been continuing with the gray rounds, and as of this writing, have added the final color to all 95 hexagons! Next up: more ends. And then stitching the hexes together! The pattern suggests whip stitch, but I think I might go with the slip stitch method described here, which I used when I made my famous granny square blanket last year. (How did I never blog about that? I SO wish I had recorded the pattern I ended up cobbling together from various other places. Since I will, eventually, one day, make another blanket like that.)

Week 19: Lots o’ Hexagons

Crochet Today had a pattern for a giant afghan made out of hexagon granny squares about a year ago, and I knew I had to make it, simply because the photos in the magazine feature an orange couch very much like mine. I started collecting the yarn for this afghan last summer, and I already owned quite a few of the colors thanks to all of those Gryffindor scarves I made way back when. I am not sure when I started making this officially, but it was in the late fall; I’d bring the yarn for one color combination out to Dan’s for the weekend and crochet while he and his brother played video games. And while trying to keep poor Bluecat away. (I did end up crocheting him a few circles with extra long tails, because they do make pretty perfect cat toys. And I felt bad for having to keep him away from something so enticing.)

IMG_8730

And then Handmade52 started, and the great baby hat factory went into business… and the yarn and already made hexagons sat on my coffee table for quite a long time. Until recently, when out of nowhere, the urge to crochet became too big to ignore. So I picked this project back up, and have been making pretty solid progress over the last few weeks.

granny squares, status as of late April

There were, of course, a million loose yarn ends to weave in from the hexagons I had already finished…

handmade52.19

And then a few more color combinations to work on. I’m now working on the last color combination, and next up will be adding the gray rounds to all 95 hexagons. And then, of course, stitching them all together and adding a border. I’m pretty excited.

IMG_8728

Of course, this week I realized that my parents asked if they could maybe, possibly, if-you’re-sure-you’re-okay-with-it have the Great Orange Couch and Chair back, because they’d fit so nicely into their most recently-remodeled room, aka the grownups’ rec room, aka the room my sister and I shared growing up, but that has now been turned into the treadmill-sewing machine-and extra tv room. So when I move this summer, the orange couch will no longer be mine. And I’ve been making this afghan specifically to go with the orange couch. So my parents are now getting what will soon be a pretty spectacular hexagon afghan. Which means I can make another one for me. (Maybe.)

Week 18: Fingerless Mittens

a new project

I have been wanting to make proper fingerless mittens for a while, and even more after my failed attempt at crocheting cabled ones a few weeks ago. (I abandoned that project; I attempted to make them with at least 5 different hook sizes to get the gauge right, and it never got there, and I was frustrated beyond the point of enjoying myself, so I let it go.) Right around that same time, Design*Sponge wrote about how to host a knitting party (which honestly sounds like a lot of fun; maybe I’ll do something like that one day), and the post included instructions for knitting easy fingerless mittens.

IMG_8658

I finally got around to visiting the yarn store near me, figuring that this pattern was straightforward enough (and didn’t call for a large amount of yarn) that it would be fun to buy some “fancy” yarn to use. I ended up buying Debbie Stoller’s Luxury Tweed Chunky in a dusty purple, because it looked amazing next to my pale gray coat.

IMG_8661

These knit up super fast, even for this beginning knitter, and sewing the seam with a thumbhole couldn’t have been easier. Of course, I finished them just in time to … not need wristwarmers anymore, but that’s okay. I loved this project, and will definitely make another pair someday. (And I’m pretty sure there will be a few pairs to give as gifts, too.)

IMG_8690

Week 17: Nook Case

So as y’all know, I have now had my Nook for a few months, and am really loving it. I have been using a cover that Dan bought me for Christmas, and it is hot pink and folds open like a regular book, except it has a handy dandy notepad in it, too. And it’s a great cover, but I discovered that (for me, at least) the kind of cover that opens like a book and folds back on itself is really awkward and unbalanced to hold while reading. It started to drive me crazy.

So I started shopping online for a new case, thinking a flip-top case or just a simple cozy that just stores the Nook when you’re not reading it would be the best. I didn’t really find anything I liked, but I resigned myself to choosing a really basic neoprene zip-top case and was moments from clicking “submit order” when I saw that Marianne had just posted a photo of the cozy she had just knitted for HER Nook. (What? I multitask. Always.)

And I said DUH. Why did it not EVER occur to me to make one for myself? With all the freaking MAKING OF THINGS that I have been doing since 2011 started??

I started on Ravelry, but was too drawn to the cable-knitted cozies (and I don’t know how to knit cables yet), so I turned to a basic Google search. It didn’t necessarily have to be a pattern for a Nook-specific case, but if I could find one where someone had already figured out the measurements, I was all for that. I found this pattern from Little Birdie Secrets and loved it.

nook case

I decided to crochet stripes because I was so in love with the colors I used for Thea’s hat, and had a really fantastic time choosing buttons at the local fabric store. (Okay, fine, I bought way more sets of buttons than I needed for this project.) I actually also bought white rick-rack because my brother said this would look like a kind of adorable monster if I added some teeth.

handmade52.17 nook case

As I was starting, I had a feeling that it wouldn’t be quite wide enough, but decided to just go with the pattern’s measurements. Of course, in the end, it’s a little too snug, but I’m hoping the yarn will stretch a bit. This is also the first time I’ve ever used (or, hell, heard of) moss stitch, which works up amazingly fast and looks really great. I’m not happy with the not-perfect job I did stitching up the sides, or the fact that I probably should have blocked this with pins and all that jazz so the edges stop curling… but it’s just so cute! And stripey. I will probably make another one in other colors, because it’s not like I don’t already have the buttons. Or extra yarn.

Week 16: Gnome Hat

This Handmade52 project sometimes feels like the Hats All The Time project, but I can’t help it if they are easy and so giftable. Dan’s very good friends had a baby last year, and I wanted to be able to make something for Dan (and me) to give to Oskar to honor his first birthday, which was at the beginning of April. I’ve clearly been hoarding hat patterns since the fall, but when Craft linked to a pattern for a gnome hat from Lorajean’s Magazine, I wanted to make it IMMEDIATELY.

IMG_8378

I have made a lot of baby hats in the last eight months or so, and I might have to go ahead and say it: this gnome hat may be the winner in terms of easiness plus cute factor. Poor Oskar doesn’t really like hats right now, so I couldn’t get a photo of him in the hat, but it was just the right size and to-die-for cute. (Seriously, click through to the pattern to see it on the head of a baby. Adorable.)

IMG_8373

Week 15: Pom Pom Hat

IMG_8306

I have been planning to make this hat for Thea’s birthday for a while, and then had to keep it a secret until I knew the package had made its way into her (parents’) hands. I used another pattern from the Inner Hooker etsy shop, and it was an interesting twist on a hat, simply because it isn’t started in the round because it’s, you know, a rectangle.

IMG_8308

Again, I made the 3-6 month size (with a few extra rows of each color at the bottom), perhaps knowing that it’s not exactly hat time of the year, but I think it turned out pretty adorable. Even though I don’t get along very well with pom poms, stupid “easy” pom pom maker be damned. (Also, why are they referred to as pom pons when everyone says pom poms? Is everyone wrong? Is it like how everyone pronounces “sherbet” wrong?)

Week 12: Not a Success

handmade52.12 not a success

I have been wanting to make these cabled mitts from Crochet Today ever since Erin posted about them a few months ago. And once I got past a few days of being completely disinterested in crafts at all last week, I started on these. I was a bit nervous, just because these included a few crochet skills that I haven’t ever used (the cabling, and crocheting only in the back loops) but everything seemed to be going okay at first. But as I was working on them last night, I had to admit that something had gone wrong somewhere, and I’m still not sure what it was. It’s especially frustrating, because as far as I can tell, the cables (the part I was most worried about) seem fine. This is supposed to be the left, but it’s clearly the right, and there’s no way it’s big enough (I stopped with only a few rows to go in the pattern) to wrap around my wrist. I figure I’ll have to start these from the beginning, either with different yarn or a bigger hook. Sigh.

Week 10: Super Giant Cowl

Lately I have been making a lot of things for others (joyfully, because there is a limit to how many knitted/crocheted things one can make for oneself), and since I didn’t have any gifts lined up, I decided it was time to make something for myself. And I also really wanted to go back to knitting for a while, since I have been back on the crochet bandwagon in the past few months. I wear the hell out of my two (store bought) infinity scarves/cowls, just because of how nicely they drape, and found this pattern on ravelry and figured it was time to actually make one for myself. Plus, this one is chunky and oversized, which is exactly what I was looking for.

handmade52.10 super giant cowl

I suppose I should tell my perfectionist side to ease down a bit, considering the fact that this is still only the 5th thing I have ever knitted, but… you know how it goes. I think one of my biggest frustrations so far with knitting (as opposed to crochet) is that I really don’t know how to fix my mistakes, or even figure out what the mistake was. The first time I cast on, I twisted the stitches when I joined in the round, which would have made a nice purposeful mobius-ish twist, but was really not my intention for this cowl. So I started over. And then somewhere along the way (four skeins in), I dropped a stitch or skipped a stitch, because there was a mysterious button-type hole, and then later I mixed up my knits and purls and I just don’t know what happened, but I don’t like how it looks. And more than anything, I was so jazzed for knitting near perfect seed stitch for, like, 12 inches, and THEN making mistakes and making it look worse by trying to fix it.

mini blanket, or, giant cowl

Either way, I ADORE seed stitch, and bulky yarn, and will probably make another one of these in another color. Or maybe I’ll crochet a bulky cowl, just for variety. (I know my sister wants one of these already, so regardless, I’ll be making it again!)

Week Eight: Linoleum Prints

This particular crafty adventure has been in the works since way back in December when I revealed my linoleum-printed holiday cards. Pookie and Schnookie and I have been joking for a while about trying lots of new things until we stumble upon what will lead us to internet crafty millionaire-dom. They’ve been pondering all sorts of things and I love papercrafts, and we decided to plan a Craft Spectacular Day to start from the beginning and try linoleum printing together.

We settled on Presidents Day, because all three of us had off for the long weekend. We spent a while browsing online for supplies, and each of us bought a few linoleum blocks, a carving tool set, a roller, and some paint. I supplied the endless paper (I used this event as an excuse to buy a pound of scraps at the craft store last week, and boy was THAT a treat) and pencils and tracing paper.

The only hitch in the plan that day was that there was some sort of water main break at my apartment complex, so I hadn’t had water since the late morning. But we figured it would be back in a few hours and got started anyway.

I think the hardest part for all of us at the beginning (okay, well, all day) was trying to figure out what to carve. It’s hard to be very precise on the linoleum, so you’re trying to think of something that would be easy to carve but not boring at the same time. The basic method is to draw your design on tracing paper, flip the tracing paper over onto the linoleum block, and rub the back of the tracing paper so the pencil lines transfer (backwards) onto the linoleum. We then floundered a bit with whether we were carving the positive or negative image, too.

IMG_7959

The blocks are super hard, so you need a lot of pressure to carve out the designs. I was busy telling them about how my mom had warned me to be super careful while carving, because the carving tools are reeeeally sharp, and maybe she thought we should wear gloves on her left hand… and that’s right about when my right hand slipped and I jabbed the damn carving tool right into my left pointer finger. And my water was still off. And it was bleeding. And my mom TOLD ME SO.

the injury

We all laughed heartily about that for a while, or I pretended to laugh heartily to disguise how much my hands were shaking, and how afraid I was to actually look at the wound, and Pookie and Schnookie looked at me shifty-eyed and asked if we needed to go get me stitches. Then they made me eat cookies. It turned out to be not too bad, other than the holy crap that hurts factor, and the I can’t believe I stabbed myself during crafts factor. But my dad had put together a pretty serious first aid kit when I moved into my first apartment, so I had lots of bandaging materials.

first print

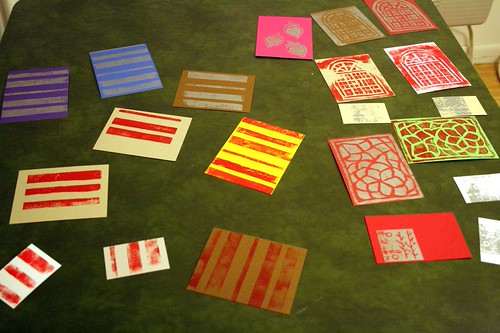
At this point we had just started printing with our first blocks, and were pretty excited about the results. I, naturally, stuck with super boring stripes, but Pookie carved a masterful strawberry, and Schnookie made a spool of thread which was intense. And the prints? Especially on my array of colored paper? Are SO cool!

We did that for a while and then broke for the almost-as-important trip to Pete and Elda’s portion of the day. I also really, really needed to use the bathroom (still no water) and was concerned about not having really washed my wound yet. So we did all of that, and ate a surprisingly large amount of pizza and drank a bunch of beer (to fuel the crafts). And I thought, as I do every time I am there, that I need to set up some sort of rotation so that I can get myself to Pete and Elda’s on a more frequent basis.

that beer tasted SO good.

SERIOUS YUM

We then went back to my apartment and started carving new blocks, trying to be more creative or correct the mistakes that we made the first time around. (Or, you know, not stab oneself in the process). We also had some rubbery looking blocks (they looked and smelled like gigantic art erasers) that we used the second time around, and these were much easier to carve but seem to be a little more flimsy. So I think the idea is that you use the hard gray blocks if you want to keep the block and reuse it again and again, while you use the easier to carve blocks for more intricate designs that you don’t need to keep? (Going back to the gray blocks after the ez-carve ones was IMPOSSIBLE.)

more stripes

our masterpieces

circles

So we had a day of crafts, pizza, beer, and hilarity. And we made some really cool cards in the process. I think next time I carve linoleum, I will think a little more in advance about what I want to make in the end (which will, let’s face it, be stripes because I both cannot draw and am unoriginal). But really, this was just an awesome time all around. (And I didn’t need stitches.)

Week Seven: Tetris Cross Stitch

I haven’t cross stitched anything since Christmas 2009, when I finally finished the third Elizabethan knot garden for my mom. It’s a nice craft when you want a quick return (or, the mostly simple designs I tend towards are), but it’s definitely something that falls in and out of favor.

I wasn’t really planning to do anything special for Valentine’s Day this year; I have made cards for Dan for the previous two years (2010 and 2009) and made him a (rather awesome) cross stitch that first year, too.

handmade52.7 tetris cross stitch

But then I saw the pattern for a “You Complete Me” tetris cross stitch on the Craft: blog a few months ago, and knew I had to make it. It hits that nerdy-crafty vibe I like so much, and the sentiment? Well that is perfect, too.

there is something so orderly

And he loved it. And I love it. So it’s perfect.