
I got to a bit of a delayed start with Project Life in 2013, although not for a lack of inspiration. I took Studio Calico’s Day by Day class to keep the ideas flowing while I waited impatiently to be able to order the Seafoam core kit and binders. There was also that whole wedding thing that sort of demanded my free time up until the 20th, too. But this past week, I was finally able to start creating the pages for this year so far, and I still love it so much.
A few differences this year: I’m trying to include more photos that weren’t taken with my phone, and for the first part of the year, I’m using Photoshop Elements to add text to create a title card for each week. I stuck with the 3×4 Week in Review cards, despite them being sort of tedious at times, because I like the completeness of being able to add a bullet point about something that may not be documented otherwise. I am also using 3×4 calendar cards each week from Splendid Fiins, which I really love so far. (Although I better keep loving them, because printing the year’s worth on card stock was one of the projects I did before I had the rest of my supplies!) I also decided to start my weeks on Mondays rather than Sundays, to keep the weekends together. I’m aiming to stay as caught up as possible now that the bustle of the wedding is behind us, but we’ll see how that goes as the year progresses.

I kept the cover page simple and I’m really happy with how it turned out. I bought the glittery paper, striped paper, and polka dot paper at Hobby Lobby before I got the seafoam kit, and the badges are all from Ormolu.

The left side of week one. I took a pretty decent number of photos that week, but diving into the Seafoam kit was great, too.

The right side of week one. We did a lot of wedding-related things that week, including a final visit to the brewery to set up table arrangements.

Week two, left side. This side ended up being a lot of almost black and white photos, as well as simple journaling and the text from this blog post.

Week two, right side. The top left slot is an awkwardly-cut down envelope containing the photos from my hair and makeup trial… which by the time I made this page, didn’t need to be kept secret. Oh well. I also included some progress photos from the wedding plans, and the front of one of the cards my sister got customized as thank you notes for my shower.

Week three, left side. This was the week of the wedding, but as you can imagine, there was a LOT to document from Monday through Saturday. I made the decision to keep this spread just for those days, with a new spread and a ton of inserts for the wedding itself. I think it worked out very well. I again included the text from that last pre-wedding blog post, since it really captured how I was feeling that week.
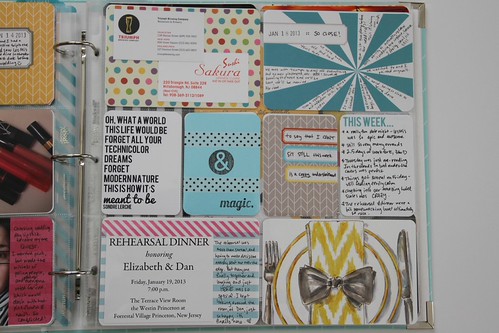
Week three, right side. Would you believe that I don’t have a single photo from our rehearsal dinner? I have no idea how that happened… so I journaled and cut the invitation down for the bottom two 4×6 slots instead.
So that’s the start! Next up: a post to show you all of the wedding inserts I made that I’m so jazzed about, and hopefully getting into a new routine now that life seems to be settling into a new (married!) normal 🙂

yay! love it all. can hardly wait to see your wedding pages!!
I can’t wait to see the wedding pages either. The pictures I have seen were just gorgeous, and it will be a great way to fit it right into your PL. I especially love all the little journaling you’ve managed to get into your pages. I always feel so blank when it comes to the journaling. I suppose I need to work on that more. I’ll be looking forward to your next update!
Very cool! I’m so behind with Hannah’s book, I need to follow your inspiration and get going with it!
Yay! Great job keeping so up-to-date. I really like your title card style! Can’t wait to see all the wedding pages!